Eclipse is a IDE (Integrated Development Environment) extremely powerful and flexible, being the most used for various purposes: Java development, Android, C++, processes modeling, report design and so on.
Utilizing a good IDE is essential for productivity because its countless tools and features will make the difference in our daily searching for defects, refactoring, integrating with SCM (Source Control Management) like SVN, CVS, GIT, Mercurial or Bazaar, and other stuff.
Downloading Eclipse
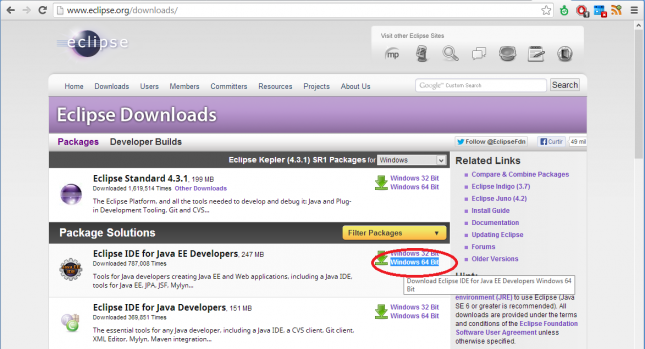
Go to http://www.eclipse.org/downloads/ in order to download Eclipse IDE for Java EE Developers. Choose the corresponding version for your system, in my case, Windows x64. Look at the image below:
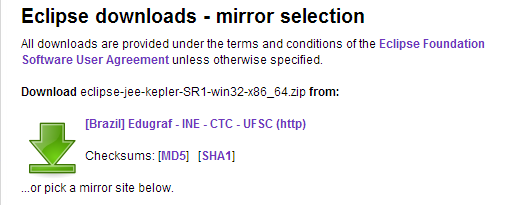
When you click on the link, you’ll be redirected to another page where you will choose a “mirror”, that is, a copy of the file in a server next to you. Click on the green arrow to begin the download, according to the image:
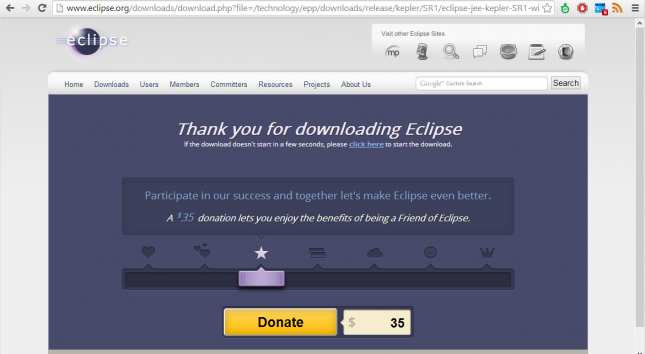
The download will start and the browser will show you this page:
In the future, consider donating to make Eclipse even better.
Installing Eclipse
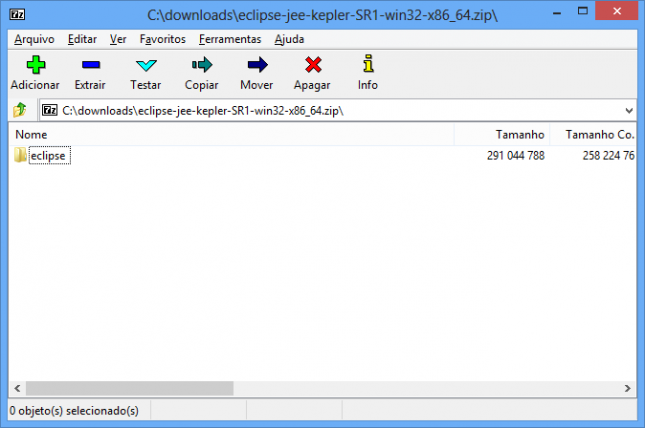
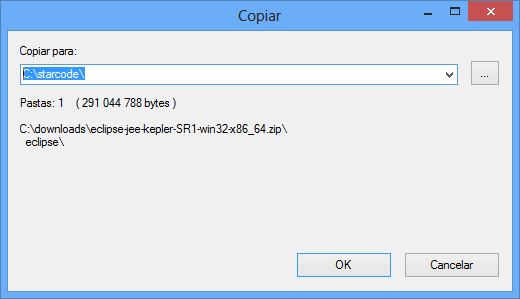
In this and next tutorials, the directory c:\starcode will be adopted as the base directory for installing applications and storing files. If you want, replace “starcode” with the name of your company, organization or whatever you want, just avoiding whitespaces or special characters. Find the downloaded file, unpack it in the directory c:\starcode\eclipse, according to the following image:
In this example, I’m using 7-Zip. Open the file and press F5 or go to menu File > Copy to.... In the dialog, type c:\starcode.
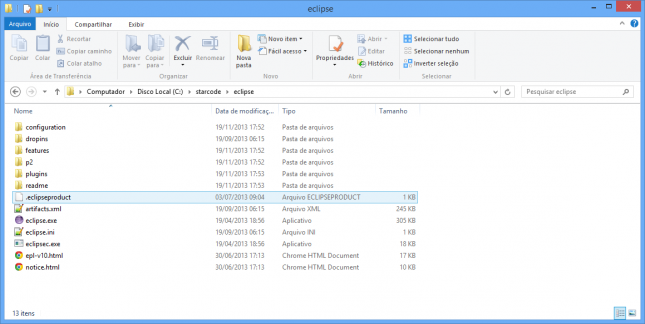
Confirm and check if the content in the directory c:\starcode\eclipse is like the image:
Configuring Eclipse
Before opening Eclipse, let’s tune a few parameters that affect the memory usage in order to get the a better general performance of our IDE. Edit eclipse.ini in your favorite text editor (I suggest Notepad++). The original file should be something like this:
-startup
plugins/org.eclipse.equinox.launcher_1.3.0.v20130327-1440.jar
--launcher.library
plugins/org.eclipse.equinox.launcher.win32.win32.x86_64_1.1.200.v20130807-1835
-product
org.eclipse.epp.package.jee.product
--launcher.defaultAction
openFile
--launcher.XXMaxPermSize
256M
-showsplash
org.eclipse.platform
--launcher.XXMaxPermSize
256m
--launcher.defaultAction
openFile
--launcher.appendVmargs
-vmargs
-Dosgi.requiredJavaVersion=1.6
-Xms40m
-Xmx512m
It’s important to understand exactly what we’re doing here, because the changes we’re going to do depend on the environment Eclipse is running. The following parameters will be modified or added:
- X:MaxPermSize / launcher.XXMaxPermSize: this parameter defines the maximum amount of permanent memory Java will use to store information about class structure (bytecode). The “permanent” memory will limit the total of classes we can load in memory. This parameter should be increased if you have many projects with many jars each. The parameter launcher.XXMaxPermSize is used in older versions, so we’ll keep it for compatibility.
- XX:PermSize: we’ll add this parameter to define the initial amount of permanent memory Java will allocate. If the value is too small, the performance will suffer because Java will in interrupt the execution of the program frequently in order to allocate more memory.
- Xmx: defines the maximum amount of dynamic memory Java will allocate to store object instances and variables that can be allocated and deallocated at any moment.
- Xms: defines the initial amount of dynamic memory.
The default value of XXMaxPermSize parameter is reasonable, but we’ll add XX:PermSize in order to obtain better initialization speed. That way Eclipse won’t need increase the memory many times.
The values of Xmx and Xms can be modified depending on your computer power. As I work in various projects and I have 8 Gigabytes of RAM, I’ll put a maximum of 2 Gigabytes in Xmx and an initial 512 Megabytes in Xms.
The final version of the configuration file goes like this:
-startup
plugins/org.eclipse.equinox.launcher_1.3.0.v20130327-1440.jar
--launcher.library
plugins/org.eclipse.equinox.launcher.win32.win32.x86_64_1.1.200.v20130807-1835
-product
org.eclipse.epp.package.jee.product
--launcher.defaultAction
openFile
--launcher.XXMaxPermSize
256M
-showsplash
org.eclipse.platform
--launcher.XXMaxPermSize
256m
--launcher.defaultAction
openFile
--launcher.appendVmargs
-vmargs
-Dosgi.requiredJavaVersion=1.6
-Xms512m
-Xmx2G
-XX:PermSize=128m
-XX:MaxPermSize=256m
Running Eclipse
Execute the file eclipse.exe. You’ll see the splash screen for a while:
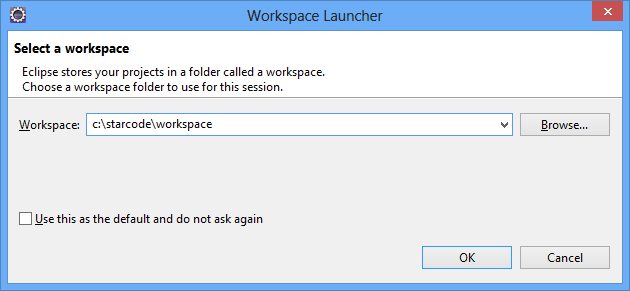
After that, you’ll be welcomed with the Workspace selection screen (Workspace Launcher). A Workspace is a place (a directory, actually) where your Eclipse’s configurations are stored, containing as many projects as you like (even though they don’t need to be in the same place). It means that, with only one Eclipse install, you’re able to create many Workspaces in different directories and each one will have its specific and independent configuration and projects. Eclipse can be executed in multiples instances so you can work in multiples Workspaces simultaneously, with the exception that you cannot open the same Workspace in different instances at the same time.
Let’s continue. Type c:\starcode\workspace and click OK, as the image below, in order to create a brand new Workspace in this directory.
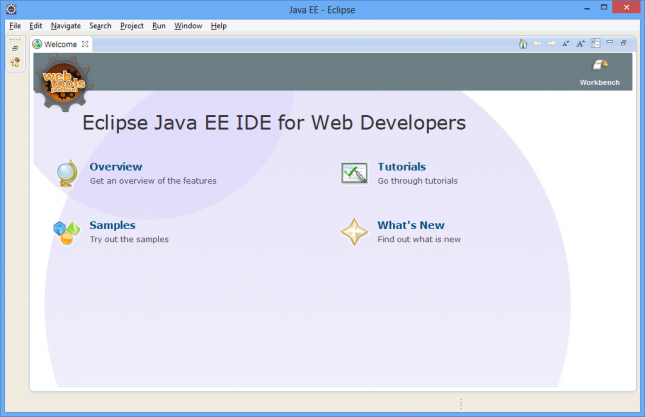
Wait a few moments and finally your IDE will appear, showing the Welcome screen:
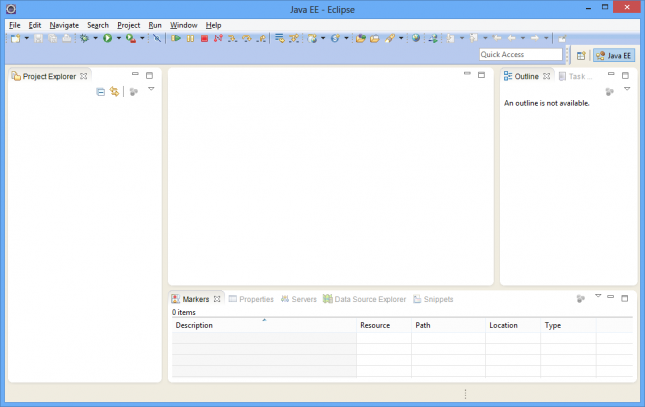
Close the Welcome screen clicking on Workbench link, at the top-right corner. Now, the main work screen will be presented:
Configuring the Workspace
Let’s do some basic and visual configuration. The first is to change the perspective. Eclipse is a multifunctional IDE and that means it allows you do different activities, for instance: write Java code, create database queries, debug the program, commit and update files from a remote repository, etc. Certain activities are associated to perspectives, which contain the components (named Views) more suitable for the task you are doing.
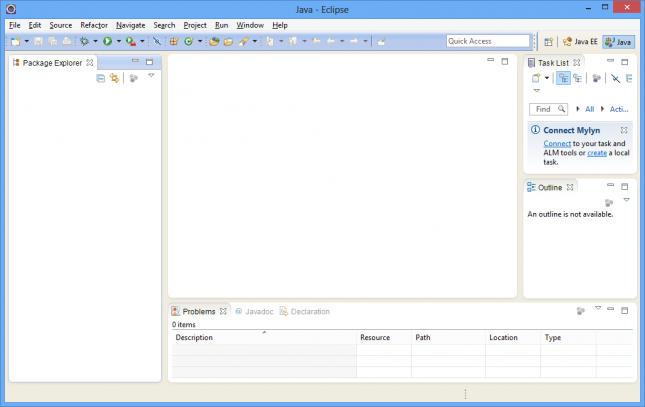
Go to Window > Open perspective > Java. Notice that the window changed a bit, according to the image below.
Let’s quickly look at some components of that screen:
- Main Menu (at the top): it gives you access to all available features. Some items and menus change according to the perspective currently selected or according to the file currently being edited.
- Toolbar (below main menu): the buttons contain the most used actions and also change according to perspective or file.
- Package Explorer (at the left): view that lists projects and their files.
- Problems (at the bottom): view that shows errors and warnings found by compilers and validators in the build process.
- Center screen (blank): editor where files will be opened and edited.
Notice the Quick Access box near the top-right corner. You can type anything there (configuration name, file name, etc.) and Eclipse instantaneously will show you the results. At the right of this box, the recently used perspectives are listed, so you can swap to another one quickly at any time.
I’ll close the views TaskList and Outline, because we won’t use them in this example.
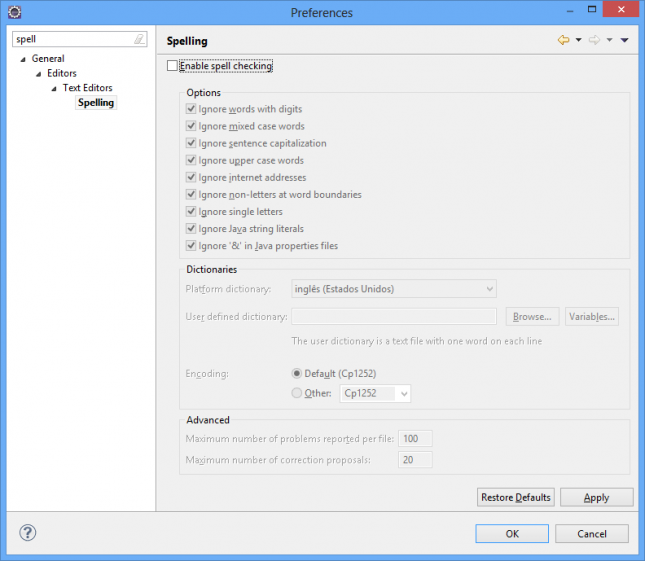
Let’s do also some configuration in order to speed our work up. Firstly, if your first language is not English, turn off spell checking. Go to Window > Preferences..., search for “Spelling” and uncheck the main option, according to the image:
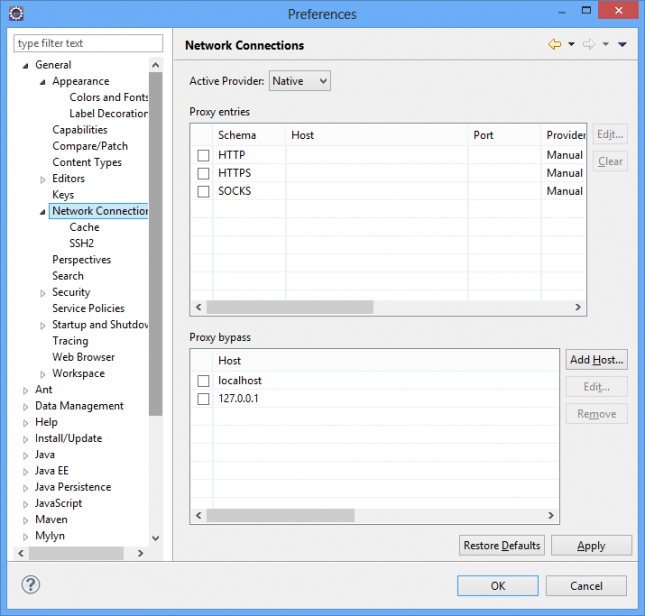
In case you’re under a proxy server, go to Network Connection configurations. Know that some plugins won’t work even with this configuration. Unfortunately, proxies with NTLM authentication cannot be configured through this method. Check your proxy type, maybe the solution is out of scope for this tutorial.
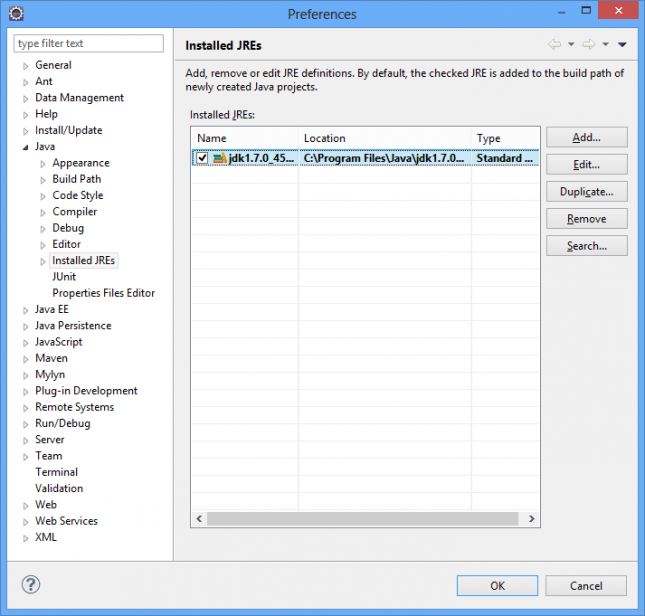
If you have JDK correctly installed, Eclipse should found it and add it automatically to its configuration. However, check if it’s ok in Installed JREs.
After accomplish your desired configurations, press OK button.
Creating a test project
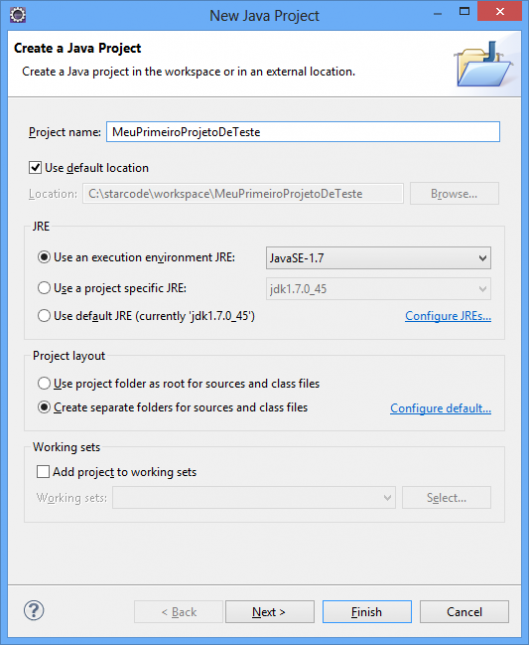
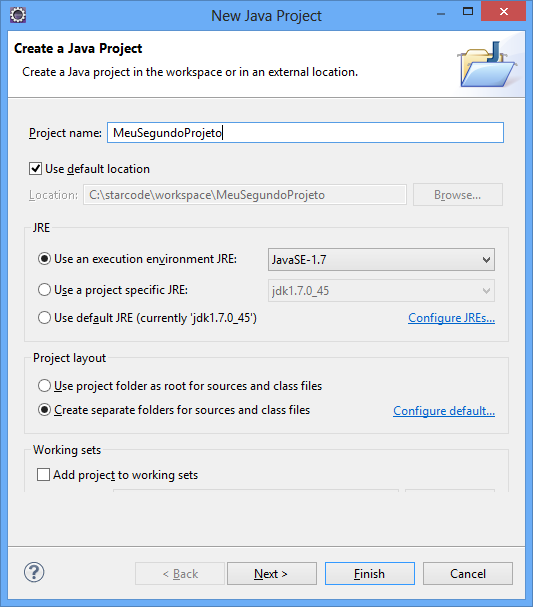
Let’s create a simple project with goal of verify the installation and make you comfortable with Eclipse environment. Go to menu File > New > Java Project. Give it a name and press Finish.
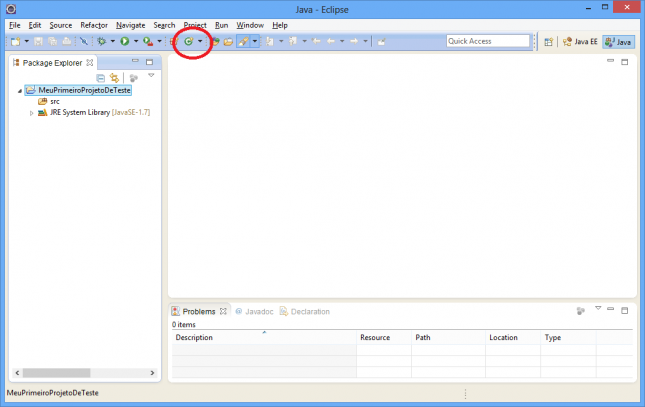
Package Explorer view will display the new project. Click on the arrow at left to show its content.
Let’s create a Java class. Go to File > New > Class or just click on the red-circled button highlighted in the image.
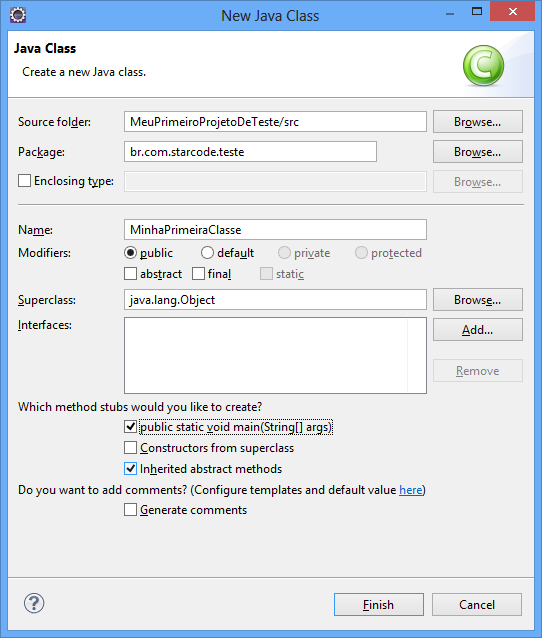
In the next screen, fill Package field out with the value br.com.starcode.teste. The default convention for naming packages is to use always lower case characters and avoid numerals, unless in special cases. Subpackages are separated using the dot character (.). Type also the class name in the Name field. Class names should follow the CamelCase convention, that is, an initial upper-case character for each word, for instance: “MyFirstClass”. Avoid special characters and numbers. For now, check the option “public static void main(String[] args)” and press Finish.
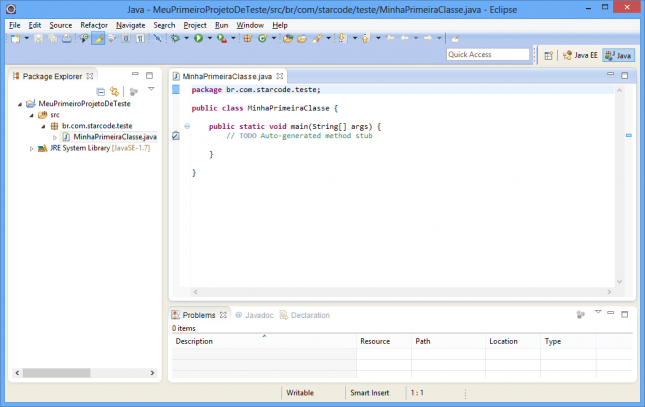
Now we should have this view:
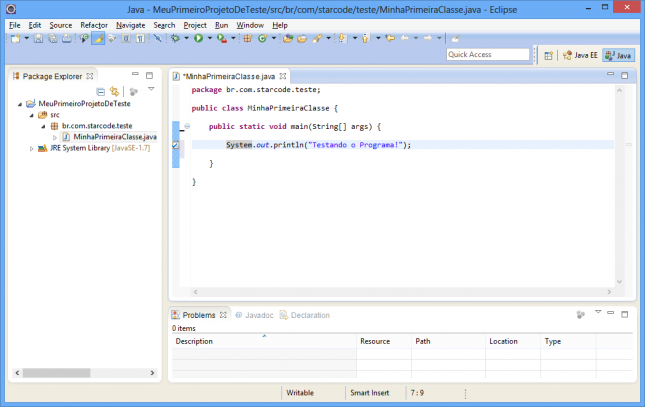
Let’s edit the main method of our class. This method is “special” to Java in the sense the program will start its execution by this method. So, remove the line with TODO comment and then type the following in its place:
System.out.println("Testando o Programa!");
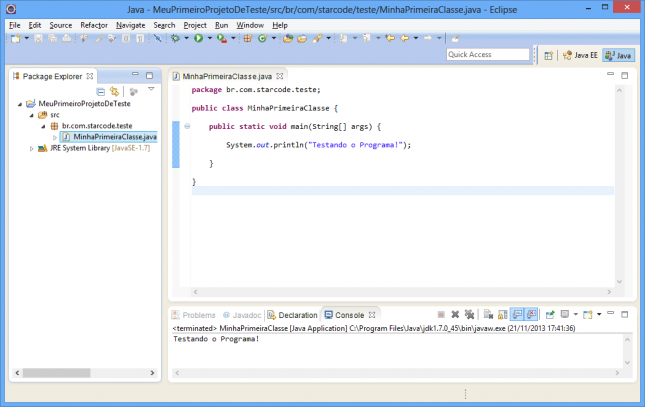
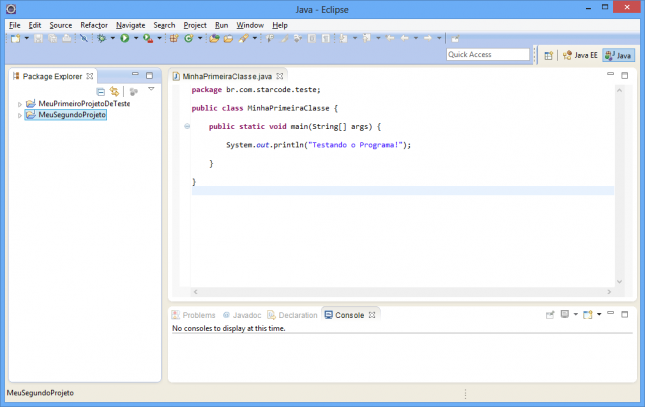
We should have this:
Don’t forget to save the file. Press Ctrl+S or click File > Save.
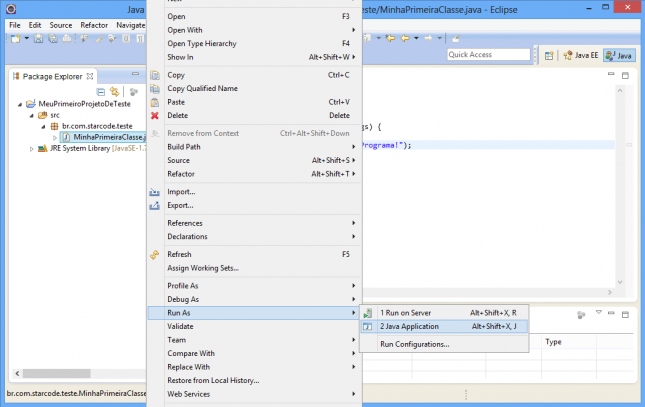
Finally, let’s run our first Java program. Click with the right button on the class and go to menu Run As > Java Application.
The Console view will appear, showing the output of our program and proving the success of the execution.
Debugging the program
With the previous example, let’s suppose for any reason you need to find a bug. In order to do that you need to stop the program execution at some point and run it line by line, inspecting variables values and following the behavior of the program.
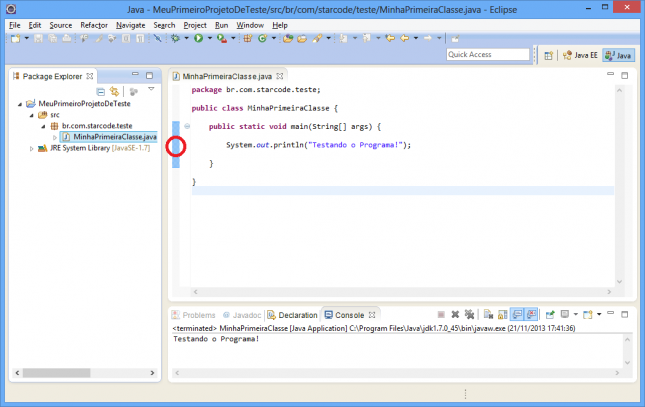
Before we start debugging, let’s create a breakpoint, that is, let’s mark the line we want interrupt the execution of the program. There are many ways to accomplish that, for instance:
- Go to the line with the cursor and press
Ctrl+Shift+B. - Double-click the blue bar at left of the editor, in the same direction of the target line.
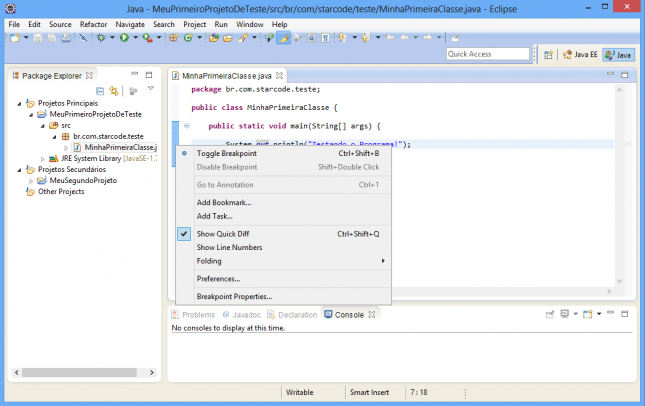
- Right-click the blue bar at left of the editor and choose Toggle Breakpoint option.
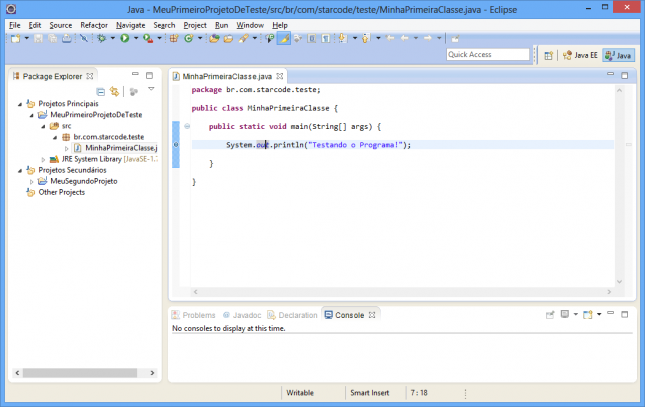
As a result, we have a small blue circle at the left of the line, as the image below.
In order to remove the breakpoint, do again one of the procedures above (shortcut, double-click or menu).
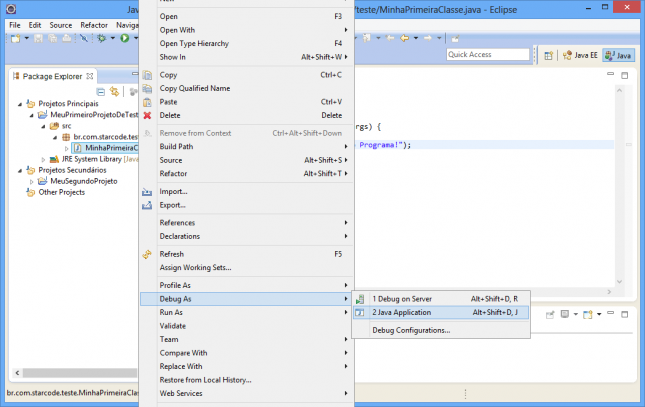
Now, let’s run the programming in debug mode. Right-click the class and go to Debug As > Java Application.
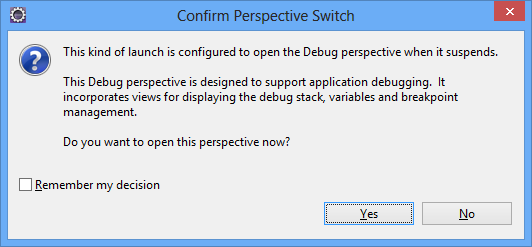
After starting the execution, when the program reach a breakpoint, Eclipse will ask if you want to change for debug perspective.
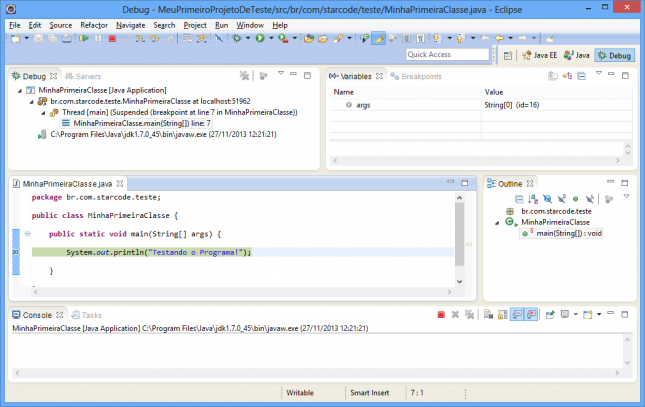
Choose Yes and Eclipse screen will change, showing other views and then, in the editor, the current line to be executed in light green.
Check out some details of the screen above:
- Debug: view showing program threads and the stack of method calls. As we have only one simple program, there’s only one thread. And as we’re in the main class, the only item in the stack is our class, its method and the number of the line being executed.
- Variables: view showing variables in the current scope. You can look at and also change the values here.
- Breakpoints: view showing all breakpoints set in the Workspace.
Until this moment, the execution is interrupted at line 7. You can inspect the values of variables in the current scope and also run a snippet of code in order to see the value returned by it through Inspect.
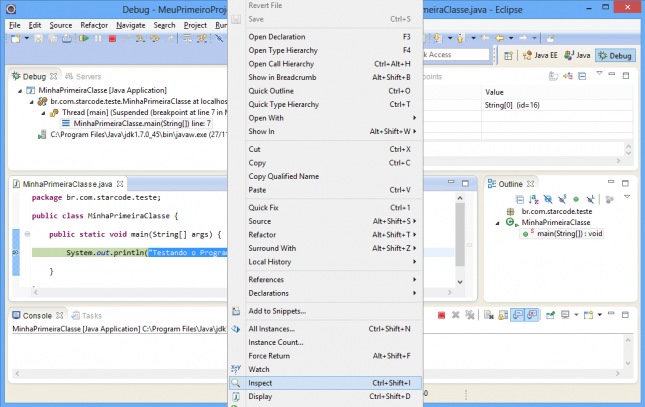
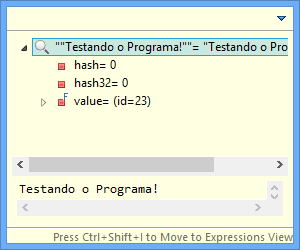
We haven’t any variables, so let’s inspect the text contained in println function. Select the text, right-click the selection and go to Inspect.
Java will execute the selected snippet and show the result in a yellow box, according to this image:
Even though in this example we have only a simple String to inspect, we could have done it with any snipped that return a value like a method call or an arithmetic expression. Just take care with Inspect because the code is actually executed, so it can change the state of your program, affecting instances, variables and its values.
Tips for project maintenance and organization
Soon your Workspace may become bloated with projects and, consequently, Eclipse performance and your user experience will get worse. Of course, you can separate your projects in different Workspaces, but there are other alternatives.
Let’s create an additional project for this example. Follow the previous steps, but this time, use another name.
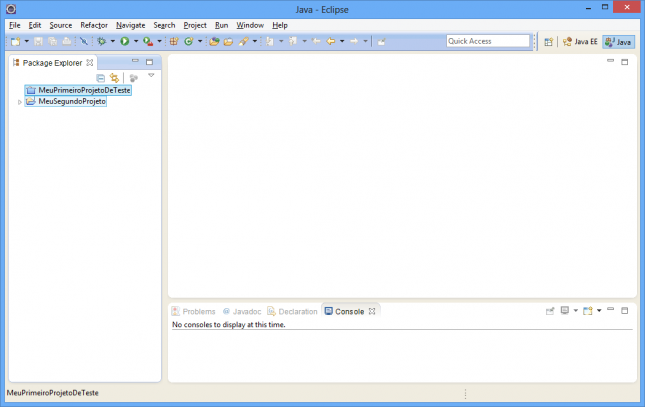
Now our Workspace is like this:
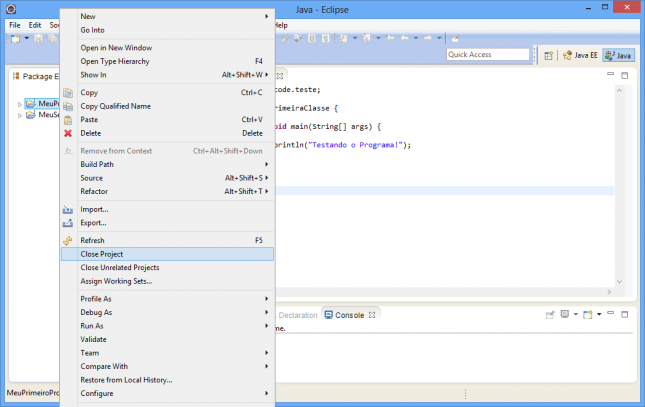
Let’s suppose now, we won’t work in the first project for a while. We can close it so it’ll exists, but won’t use any of our precious resources. When we close a project, Eclipse won’t list its files nor will cache its classes. In order to close a project, right-click the project and choose Close Project.
The project icon will change and you will be unable to access its content until you open it gain.
In order to open the project, double-click it or right-click it and choose Open Project. You don’t need to do it right now.
Going to another example, let’s suppose you have many projects in your Workspace. Is there a way to group and organize them properly? For that reason there are Working Sets.
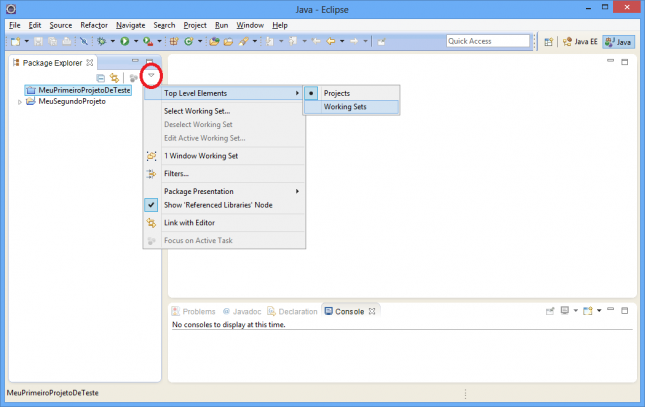
Let’s create two Working Sets. Open the menu of Package Explorer view (as indicated in red in the image below) and then go to Top Level Elements > Working Sets.
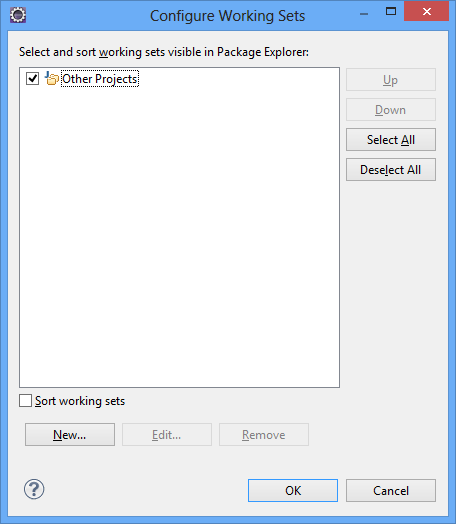
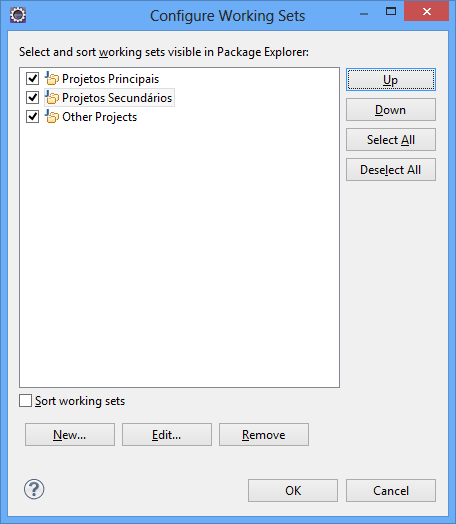
The Working Sets configuration screen will be displayed:
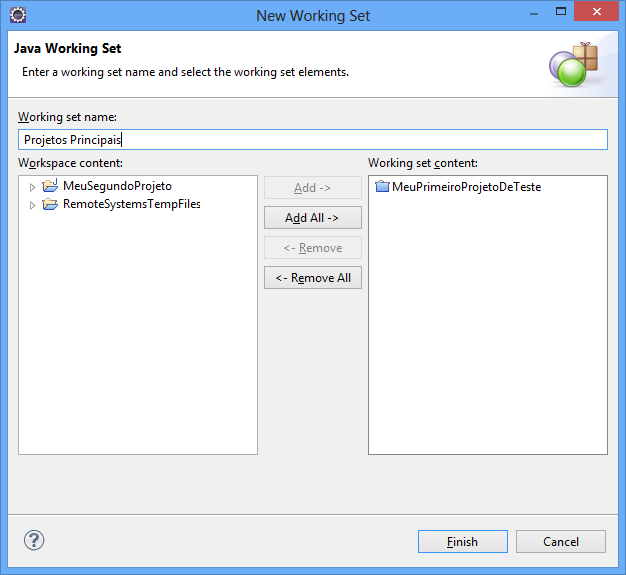
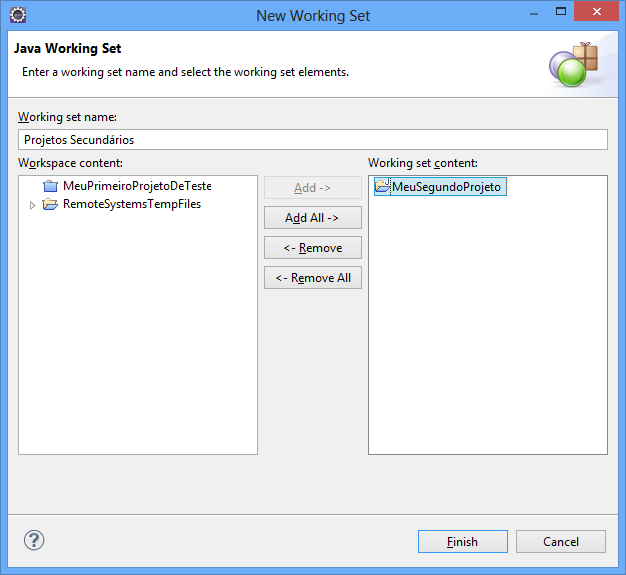
In the first place, let’s create a Working Set called “Main Projects” containing our first project. Press New... button, type the Working set name, add the project in the right list (Working set content) and press Finish.
Then press New... again and repeat the procedure to create another Working Set called “Secondary Projects”, this time including the other project we created.
Now you can sort the Working Sets. Select an item in the list and press Up in order to move the item up or Down in order to move the item down. The final order goes like this:
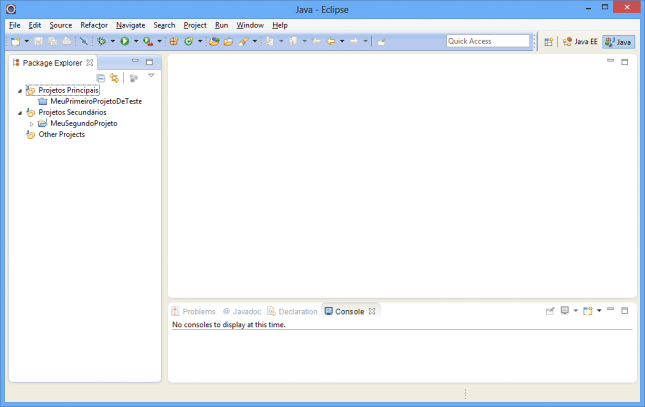
Press OK and check out the result:
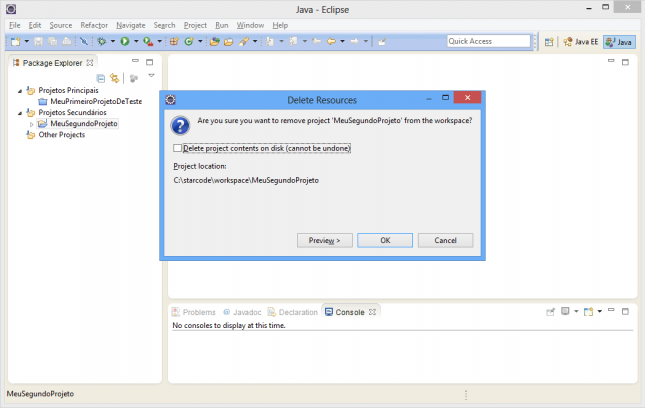
Finally, if you want delete a project from your Workspace, select it and press Delete. A confirmation dialog will be shown.
Notice the option “Delete project contents on disk (cannot be undone)”. If this option is not checked the project will be removed from Workspace, but the files will remain in the Hark Disk. It’s important if you don’t want lost data or when the project is used in another Workspace. In case the option is checked, the project and all its files will not only be removed from Eclipse, but erased from the Hard Drive, so you won’t be able to recover them later.
Summary
In this tutorial you learned how to download, install and configure Eclipse. You also had some examples of how to create, organize, run and debug a simple Java program.
Despite of being a basic introduction, this tutorial will give you the foundation to more advanced topics, which I’ll soon make available.


